Email marketing is a great way to reach customers and increase sales. But if you’re not careful, you could end up in trouble. A dedicated sending domain gives you control over what appears to be coming from your business. That means you can avoid spam filters and other issues that might make your messages get caught by unwanted mail servers.
Don’t let your email marketing efforts go unnoticed! Get started right away with a dedicated sending domain.
Please Note:
Dedicated sending domains are only applicable to the users in the LC - Email system.
Covered in this article:
What is a Dedicated sending domain?
How to create a dedicated sending domain?
How to set up a dedicated sending domain for Targeted Email Categories?
How to set up a default header for a dedicated sending domain?
Ability to turn ON/OFF email tracking
FAQ
-
How to choose a sending domain name for my account?
-
I’ve added a domain by not verified at the time/some of the records are not verified, How to verify?
-
How to delete a domain?
-
How to move sending domain from Mailgun to Venderflow?
-
How to set a dedicated domain as active/default?
-
How to set up a dedicated IP?
What is a Dedicated sending domain?
A dedicated sending domain allows you to send emails that appear to be coming from your brand, and this can help you maintain a better reputation with email services. Any company can create a dedicated sending domain, and it’s quick and easy.
By default, all emails sent from our platform will show the name of our email-sending servers in the “sent on behalf of” or “sent via” email headers:
When you set up your own custom mail server domain, you will see a different “mailed-by“, “sent on behalf“, or “sent via” field.
How to create a dedicated sending domain?
You can create multiple sending domains under your account and make one active.
- Navigate to Settings – > Email settings – > Email Services
- If you are in the LC email system, you can find the Dedicated domain button, else please switch to the LC email system to create a custom sending domain.
- Click the ‘Dedicated domain‘ button
- Add your domain details
Here are instructions for common providers:
Note:The propagation process can take up to 24 hours. If it has been longer than 24 hours please double-check your DNS settings by following the process above
- Verify Domain
Apply your new DNS records to your company’s DNS provider’s platform to activate the sending domain. Every domain host will have a slightly different method of doing this.
How to set up a dedicated sending domain for Targeted Email Categories?
You can set up domains under your account only for the Sub-account created domains. A maximum of 5 domains can be assigned to a single type.
- Navigate to Sub-account Settings – Email Service -> SMTP Service -> Dedicated Domain and IP -> Domain Configuration
Currently domains can be assigned to Campaign, Bulk email, One-One Conversation and Workflow and Payment and Invoices emails.
Default dedicated domain will be used for all other emails.
How to set up a default header for a dedicated sending domain?
You can set up default “From address and Email” for dedicated domains under your account only for the Sub-account created domains.
- Navigate to Sub-account Settings – Email Service -> SMTP Service -> Dedicated Domain and IP -> Set headers unnder dedicated domain.

The designated header will be applied to emails sent through the dedicated domain when DMARC alignment fails.
Ability to turn ON/OFF email tracking
You can enable or disable open and click tracking for emails.
- Navigate to Sub-account Settings – Email Service -> SMTP Service -> Dedicated Domain and IP -> Domain settings under dedicated domain.
Open Tracking:
- Enabled by Default: Open tracking is now enabled by default for all outgoing emails.
- How to Disable: You can now choose to disable open tracking for specific domain by adjusting the tracking in the dedicated sending domain tracking settings.
Click Tracking:
- Enabled by Default: Click tracking is also enabled by default for all outgoing emails.
- How to Disable: You can now choose to disable click tracking for specific domain by adjusting the tracking in the dedicated sending domain tracking settings.
FAQ
How to choose a sending domain name for my account?
It would be best if you used a unique subdomain that is not used for any other purpose. A subdomain is a secondary part of your root domain. For example, if your dedicated sending domain is hello@mg.yourbrand.com, your subdomain would be the “mg” portion.
I’ve added a domain by not verified at the time/some of the records are not verified, How to verify?
1. Navigate to Settings – > Email settings – > Domain services
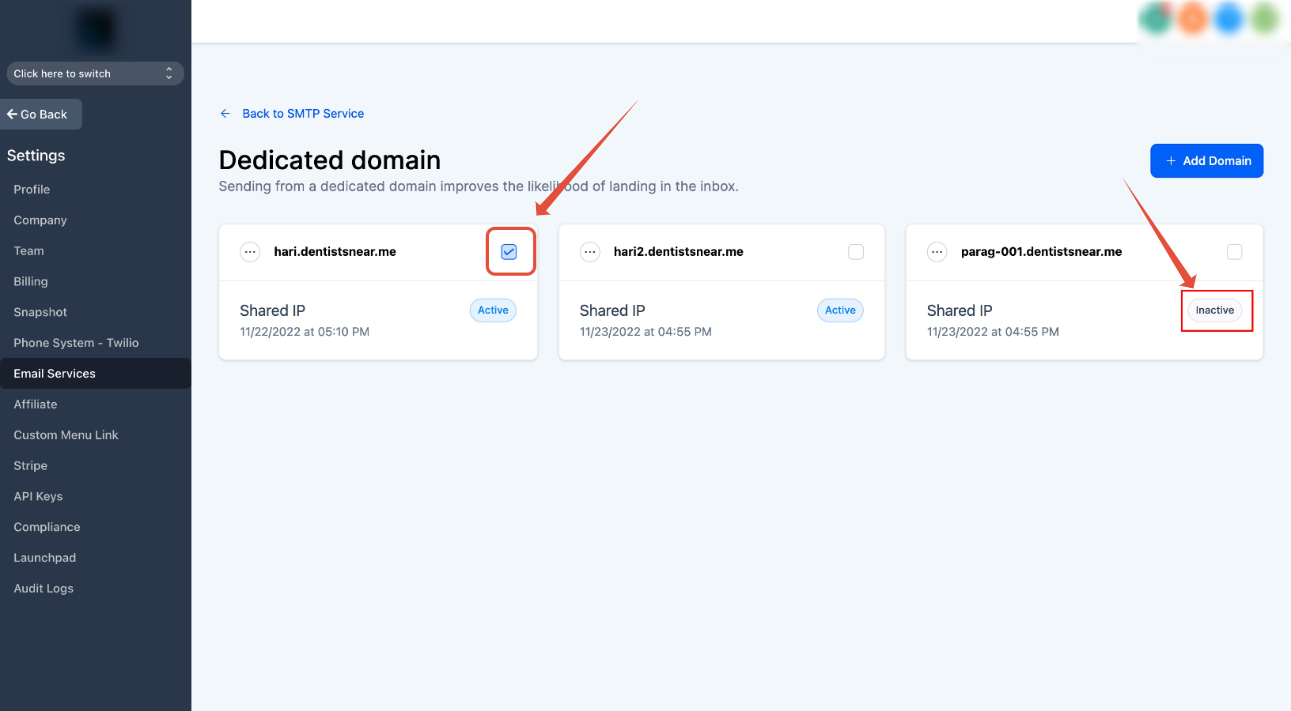
2. All the unverified domains will be in an inactive state
3. Click on the three-dot and verify button
4. You will be able to see the same records and unverified records. once you have added all the records click Verify button again
How to delete a domain?
Navigate to Settings -> Email settings -> Domain services
Click on the three-dot and click the delete button.
How to move sending domain from Mailgun to Venderflow?
Very simple, delete the domain from MailGun and create the same in Venderflow.
How to set a dedicated domain as active/default?
Check the checkbox to make as active/default


